MDF Door Installation Guide
Door Assembly Guide; Monoblock door production in the world has started as a result of the demands and needs arising from the structures where technical strength properties and visual decoration features are high and
is intended to be.
Monoblock solid door; OSFCB (Oriented Strand Fiber Chemical Board) is a product with high technical properties and high strength by blending ligno-cellulosic wood fibers with special chemicals and special glues with the OSFCB (Oriented Strand Fiber Chemical Board) method, oriented with special methods, laid with a laying machine and pressed under high temperature and pressure.

STORAGE
– Recommended environmental conditions for storage and use are as follows:
Temperature: 3°C – 40°C
Humidity: 30% – 80%
– It is not suitable for storage in open areas, in places exposed to direct sunlight, steam and heat sources
. – VarıoDor should be stored in a flat, horizontal position. Otherwise, it may be damaged and inconveniences such as sagging,
rotation, etc. may occur in its form structure. – VarıoDor should be stored in its original packaging. Damaged packages should be repaired appropriately.
– In order to communicate any defects in the products as soon as possible, they should be checked and
recorded as soon as they are received.
– VarıoDor Alize series Guillotine Glass products should be stored with a maximum of 60 pieces on top of each other.
– In Handling and Transportation Processes, VarıoDor should be transported
horizontally on a flat surface. It should not be transported upright or curved. – During transportation, VarıoDor Boxes must be tied to the vehicle to prevent slipping. However, attention should be paid to the area with the warning sign on the packaging to prevent damage to the lock
parts of the doors.
– In all handling and transportation activities, friction and direct impacts that may damage the product should be avoided so that the products do not damage each other.
– When handling products in all handling and transportation activities, you should wear protective gloves and
protective shoes to prevent injuries.
handling and transportation
– In Handling and Transportation Processes, VarıoDor should be transported
horizontally on a flat surface. It should not be transported upright or curved. – During transportation, VarıoDor Boxes must be tied to the vehicle to prevent slipping. However, attention should be paid to the area with the warning sign on the packaging so that the lock
parts of the doors are not damaged.
– In all handling and transportation activities, friction and impacts that may directly damage the product should be avoided so that the products do not damage each other.
– When handling products in all handling and transportation activities, you should wear protective gloves and
protective shoes to prevent injuries.
WHAT TO DO BEFORE STARTING ASSEMBLY
– Check the packaging of the product you have purchased. For damaged or previously opened packaged products, please notify the place where you bought the product without using
– The thickness, width and height of the wall to be mounted should be measured precisely from three points.
– Make your assembly preparations based on the maximum values of the measurements taken.
– On the back page of VarioDor catalogs, there is a table of wall dimensions that our products will cover. If necessary, you can make use of this table during ordering. – Make sure that the area to be treated is clean. – Open the packages carefully so as not to damage the products inside. We recommend that you do not use cutting tools during this process.
– Check the labels of the products you order to make sure that they are correct.
– Check that the dimensions and colors of the product are suitable for your needs and that there are no problems such as bumps or breakage in the product
.
Door Installation Guide Application
1. Check that the wall where the door will be installed is completely dry and free from moisture. If suitable conditions are not met, wait for the wall to dry for application.

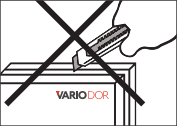
2. Kutuları açarken kesici aletlerle kutuyu kesmeyin, kapı veya kasalara zarar verebilirsiniz. Kutuyu birleşim yerlerinden içerisinde ki ürüne zarar vermeyecek şekilde açınız.
3. Check whether the size, color and direction of the materials in the door leaf, side frame and header boxes are suitable for your needs before starting the application. 4. Check whether there are any surface defects such as impact, breakage, breakage, etc. on the product surfaces.

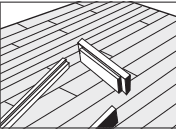
5. Cut off the excess under the frame with a clean-cut circular saw, according to the space to be left under the door leaf. The floor on which the door will be installed must be the final floor. The frame must be placed on this floor. Make the dimensioning of the frames according to the installation location by measuring from the top of the frame (joint).

6. If the floor will rise with parquet, ceramic etc. applications, this margin should be left as a gap with the support to be placed both on the wing and under the frame and the frame should be cut accordingly. Note: The recommended application method is to assemble the doors after the floor application of Laminate Parquet, Ceramic etc.

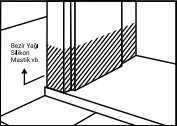
7. Water repellent material (linseed oil, silicone, mastic, etc.) should be applied to the bottom and back of the frame to be used in wet areas (WC – Bathroom, etc.) so that there are no gaps. In places where water can come in, the bottom and back of the frame and moldings should be prevented from contacting with water by applying silicone insulation materials to the corners.
8. Bring the crates in the side crates and headboxes side by side on a smooth and clean surface in accordance with the direction of assembly
. In serial works, preparing a molding table
and making assemblies on this table will make the operations faster and more comfortable
.
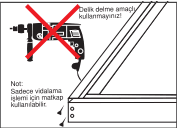
9. Do not drill and
screw from any point other than the holes in the header case. These holes in the header case are drilled as a guide and the most
suitable joining points are calculated. Make sure that the head and side case are firmly in contact with each other at 90 degrees
and screw the head and side case to the case vertically with special screws
through the holes in the head case and ensure that they are tightly joined without slipping. During this
process, make sure that the directions of the side case and the head case are correct and that there is no dust, sawdust, etc. between the case and the head
. Do the same
on the other side.
10. Take the moldings out of the box and first put the head moldings in place, then cut the length of the moldings to be attached to the side frame from the top point of the head moldings to the bottom point of the side frame on a clean cutting circular saw.

11. If the frame and moldings are squared at 45 degrees, place the top frame and side frames side by side on a smooth surface and the gap between the side frame legs should be equal from top to bottom. Fix the dowels used for assembly from the header side towards the frame part. Then apply the screws of the dowels and make sure that there is no gap. Since there is only one dowel hole especially in Oval cases, screw directly to the edge where there is no dowel hole with 5×70 mm screws. For assembly, place on a flat surface with the coated parts of the side frame and upper head jambs on the bottom. Apply the fast adhesive to the raw part of the upper header moldings. Then apply hardener spray to the mitered raw part of the side frame molding. Join the two moldings together at a 45 degree angle without shifting. With the help of a wedge and a small hammer, place the assembled moldings on the case by advancing the corner joints of the moldings on both sides with small blows so that the corner joints of the moldings do not nail. Drill the moldings so that the screws can pass through the hinge holes with a 3mm drill.
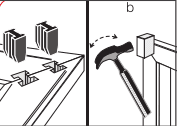
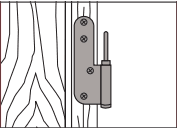
12. Install the male hinge on the case by tightening the screws
well with the pin facing upwards. Put the lock striker in place and secure it with screws.
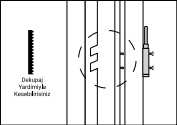
13.. In some assembly applications it may be necessary to install the moldings later. In such cases, you can install the moldings after the frame assembly by chiseling the parts corresponding to the hinge screws with the help of a jigsaw so that they do not protrude.
14. Lift the assembled crate into place and center it in the wall cavity. Make sure that the crate is held firmly in place by driving wedges on the top and side of the upper corners according to the measurements. If necessary, place a piece for elevation under the crate.

15. Mount the hinges against the door leaf. Then install the lock, making sure that the lock tongue is pointing upwards. Install the door on the frame fixed in place. While the sash is on the frame, square the side frame and the head from the hinge side with the help of a level. Check that the door fits properly on the frame. If necessary, make a gap adjustment again so that the gap between the frame and the sash is equal at every point.

16. Adjust the internal dimension so that there is a 3mm gap between the sash and the frame. Place one wedge on each opposite side of the frame at the hinge level as shown in the picture. These wedges are to prevent the adjustable tensioners from pushing the frame too much. For this reason, do not hammer the wedge enough to inflate the case.
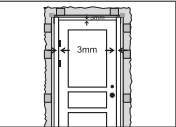
17. Attach the adjustable tensioning apparatus from the hinge alignments where the wedges are placed and stretch them
by fine tuning according to the 3mm gap that should remain between the wing
and ensure that the wedges are tightened. Close and open the door fully to check whether there is any problem
in the operation of the door leaf. If necessary, repeat the adjustment
process again.
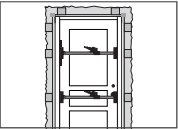
18. First squeeze the polyurethane foam in L-shape on the upper corners of the case. Then apply a maximum of 10 cm and a minimum of 8 cm of foam so that it is in line with the adjustable tensioning apparatus. Applying foam beyond these points or more than the specified amount is inconvenient as it will cause swelling in the case.
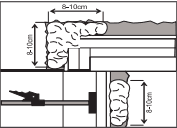
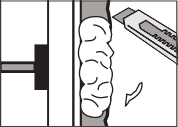
19. After the drying time of the foam has elapsed (Follow the instructions of the Foam Manufacturer! It should be left for at least 180 minutes), clean the overflowing foam with a cutting tool so as not to damage the frame. The distance between the safe and the wall cavity may also affect this time. Observing these times will prevent the case from swelling afterwards.
20. Place the moldings to be used on the adjustable side on the frame by joining them as previously specified. With the help of a wedge and a small hammer, place the corner joints of the moldings in place with small blows from both sides in a way that the corner joints do not nail. After waiting at least 180 minutes, remove the adjustable tensioners.

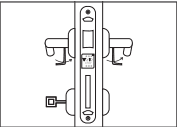
21. Finally, assemble the handle according to the instructions of the door handle company. In
handles with escutcheon, always tighten the fixing screws on the underside of the handle
fully on both sides, otherwise, when opening and closing the door, the pulling force will cause the handle to dislodge in a very short time, as the pulling force will fall on the small screws fixing the escutcheon to the wing instead of the square
shaft in the middle.
22. It is extremely important for
customer satisfaction that we pick up the cardboard and assembly debris left behind and leave it as we found it.

– VarıoDor surfaces should be cleaned with a soft, non-abrasive cloth dampened with clean water. The cloth should not be too wet. Slightly damp is sufficient. Otherwise, VarıoDor may cause deformations
and deformations that may occur due to liquid are not covered by the warranty
– In the cleaning process, particle-based cleaners, cleaning products containing acidic solvent chemicals,
chemicals containing harmful substances such as alcohol and ammonia, hard and dry cloths such as dishwashing wire should not be used.
– For more intense contamination; clean with cleaning agents suitable for general
use that do not contain harmful chemicals specified in article 2. The surface must be dried afterwards. Using soap as a cleaning
agent is not recommended as it may leave residue. – Since the hinges of our VarıoDor product may make noise over time depending on the frequency of use, lubrication should be done with a few drops of suitable machine oil after
making noise. – The information contained in this user manual does not exempt the buyer, applicator, installer and/or user from the obligation to check the suitability of the materials
for the intended use and installation purposes. – Matters to be considered;
a) Door handle sagging and loosening of screws due to continuous overload and strain on the door handles
are not covered by the warranty. b) Swelling and deformations caused by the wear or removal of insulation
materials under the frame and jambs after installation on doors used in wet areas (Wc, Bathroom) are not covered by the warranty.